
In this article:
Before you begin
About SAML SSO
SAML SSO (Single Sign-On) lets your users sign in to Cyberimpact with their Microsoft Entra ID (formerly Azure AD) identity—or any other identity provider (IdP) that supports SAML 2.0—so they don’t need a separate Cyberimpact password.
This approach centralizes and secures access to Cyberimpact. It reduces password-related risks, simplifies access to your internal tools, and automatically applies your security policies (MFA, restrictions, etc.). When someone leaves, you remove their access in Entra ID and they can no longer sign in to Cyberimpact (their Cyberimpact profile is not deleted automatically).
This article walks you through configuring SAML SSO with Microsoft Entra ID. If you use a different SAML provider, please contact our support team for the appropriate steps.
Prerequisites
-
A Cyberimpact account on the Pro plan.
-
Each user must have a valid email address as their username.
-
That email address must match the one used in your identity provider (IdP), such as Microsoft Entra ID.
-
You must have administrator rights in your Microsoft Entra ID tenant to create/configure the SAML application.
-
To enable SAML SSO for your account, please contact our support team. It is not yet possible to manage SSO configuration directly from your Cyberimpact account.
-
The request must be submitted by an account administrator or the primary contact.
-
Cyberimpact will provide you with:
-
Return URL (ACS — Assertion Consumer Service URL)
-
Entity ID (service identifier)
-
-
From your side, you will need to send us the following information so we can complete the setup:
-
IdP Entity ID
-
IdP Login URL (SSO URL)
-
IdP Logout URL (optional)
-
IdP X.509 Certificate in Base64 format (Certificate (Base64))
-
-
Required attribute your IdP must send: the user’s email address (mandatory), either as the NameID (emailAddress format) or as an email attribute.
What you should know
-
SAML 2.0 compatibility — You can use Microsoft Entra ID (formerly Azure AD) or any SAML 2.0–compatible identity provider that supports manual configuration.
-
Enabling SSO does not automatically add users from your identity provider into your account. An administrator must create users in your account and assign their roles and permissions.
-
For someone to sign in via SSO, they must be assigned to the SAML application in your identity provider (IdP), such as Microsoft Entra ID.
-
Once a user signs in via SSO for the first time, their username and password no longer work. They must sign in via SSO only from then on.
-
If you remove a user's access in the IdP (e.g., when someone leaves), they will no longer be able to sign in via SSO. If they had already signed in via SSO at least once, their username and password remain disabled, so they won't be able to sign in to your account at all. Their profile is not deleted automatically; you can disable or delete the user in the app if needed.
-
Users in your account who are not assigned to the SAML application in your IdP, and who have never signed in via SSO, can still sign in with their username and password.
-
You can make SSO mandatory for your account. In that case, only users who are assigned in the IdP and whose email address matches the attribute sent by the IdP can sign in (via SSO). All other users will not be able to sign in.
- External users are not affected by the "mandatory SSO" option. If SSO is not configured for them on their primary account, they can continue to access it with username and password, and can then access your account directly. If you wish to enforce SSO for them, remove their external user access, create them as users of your account, then assign them to the SAML application in your IdP.
- If your organization has multiple accounts on our platform, it is possible to configure SSO for all of these accounts from a single SSO application in your identity provider. Note that all accounts involved must be on the Pro plan to allow login via SSO.
- If a user has access to multiple accounts within your organization, they must be created as a regular user on their primary account, then added as an external user on the other accounts. They will then log in via SSO only on their primary account; on the other accounts, they will continue to access them through their external user status.
About two-factor authentication (2FA)
After signing in via SSO, the user must still enter their Cyberimpact 2FA code, as this security step is mandatory. The 6-digit code can be received by email (default) and/or generated by an authenticator app. If the user marks their device as trusted, they won’t be prompted for the 2FA code again for 30 days on that device.
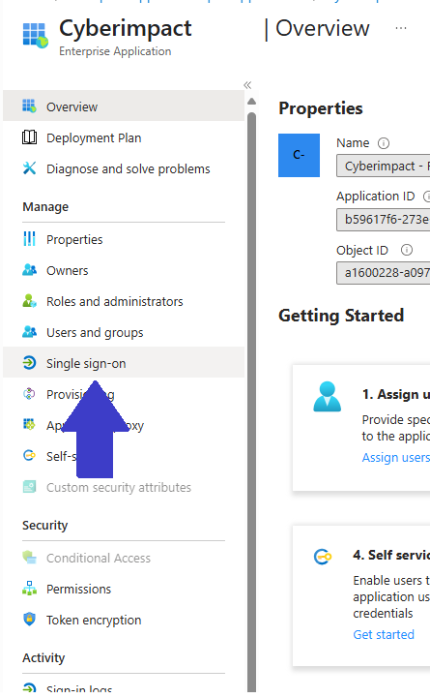
Configuration steps in Microsoft Entra ID
Create a Non-Gallery Enterprise Application
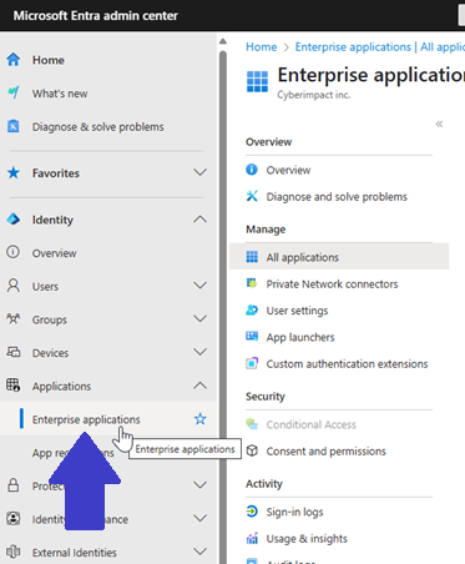
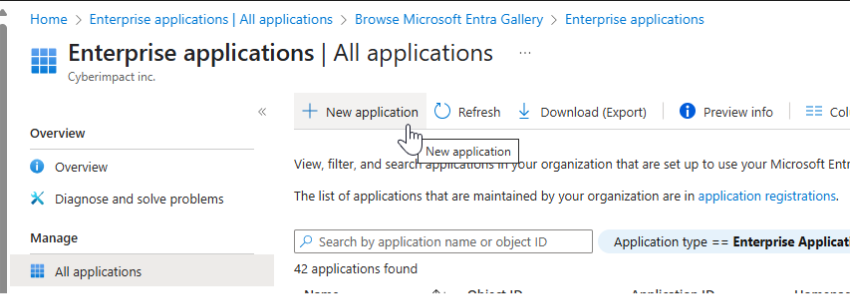
- Go to Microsoft Entra ID > Enterprise applications > New application.
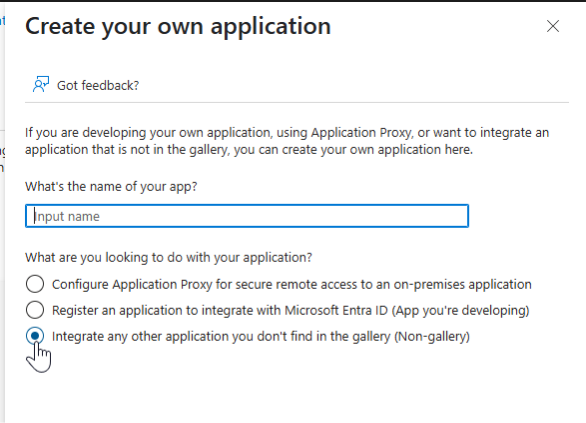
- Click Create your own application.
-
Enter a name for the application.
-
Select Integrate any other application you don’t find in the gallery (Non-gallery).
-
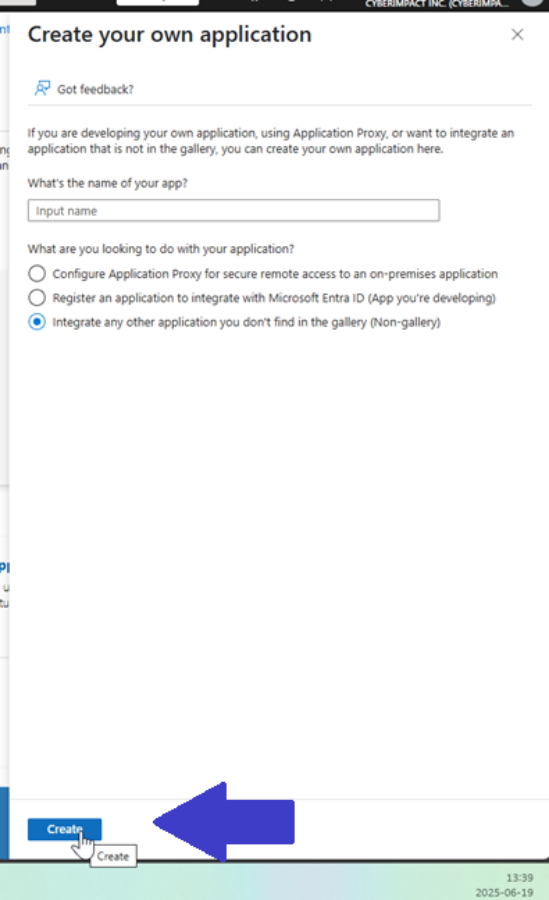
Click Create.
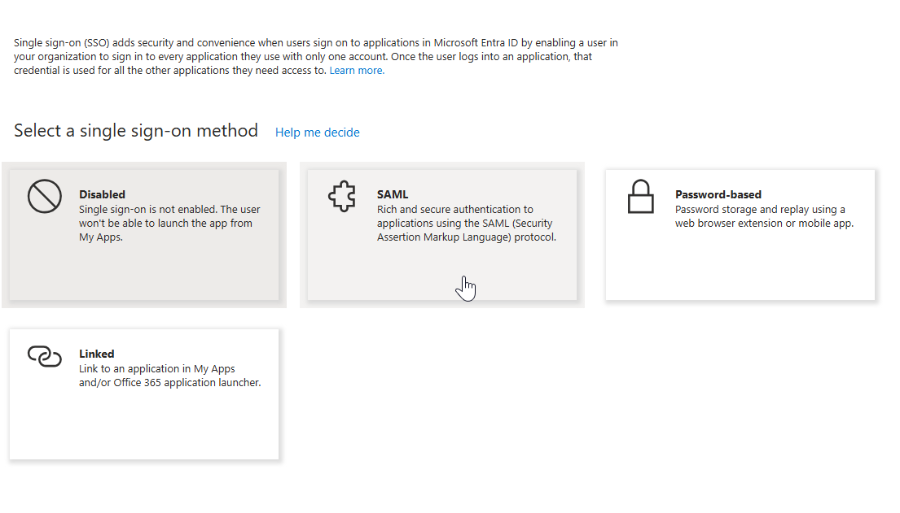
Configure single sign-on (SSO)
-
In the application overview, go to Single sign-on.
-
Select the SAML method.
-
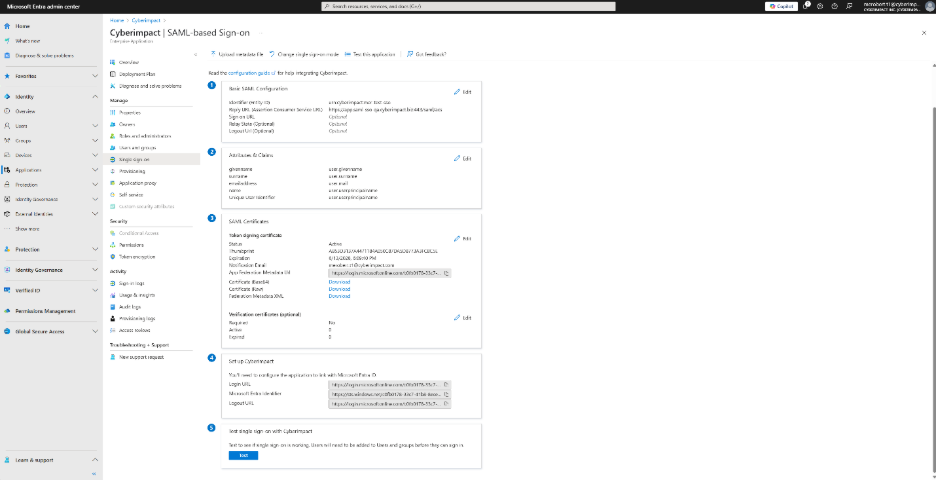
In the Basic SAML Configuration section, fill in the following fields with values provided by Cyberimpact:
- Identifier (Entity ID)
- Reply URL (Assertion Consumer Service URL
- You may leave the Index field empty.
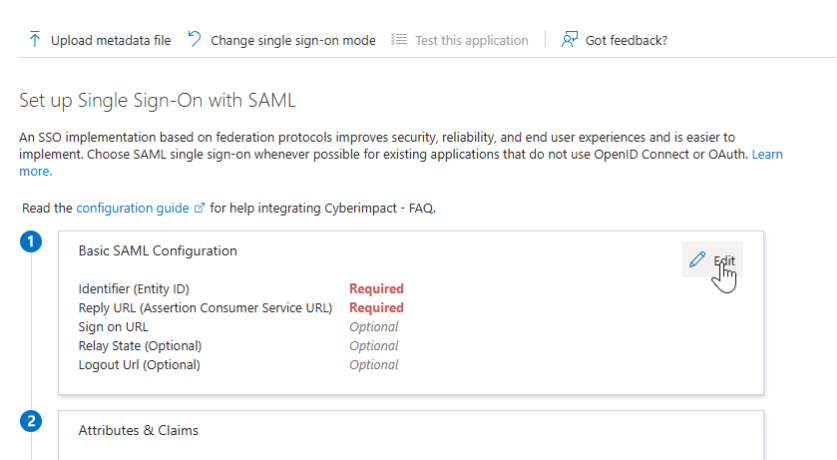
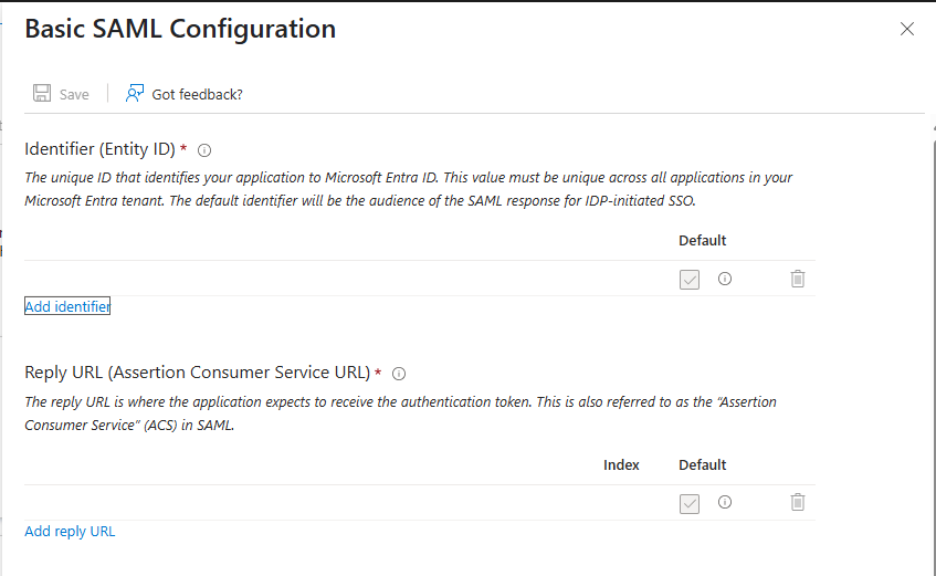
- You may leave the Index field empty.
- Click Save.
Configure attributes (Claims)
By default, Microsoft Entra ID sends attributes like user.userprincipalname. You’ll need to modify these so that Cyberimpact can match the user correctly.
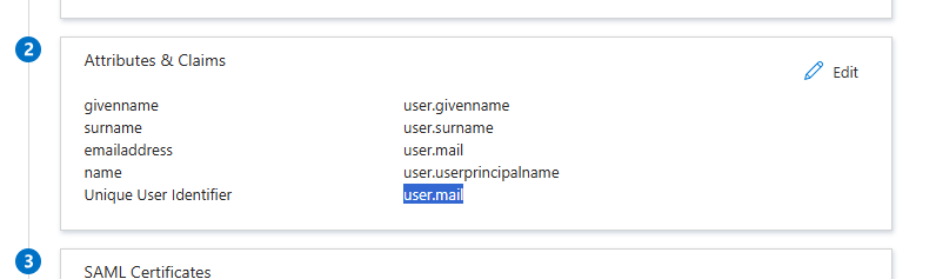
- In the application, go to Attributes & Claims.
- Click Edit.
- Set the Unique User Identifier (Name ID) to user.mail.
Send SAML metadata to Cyberimpact

- Download the X.509 certificate (Base64 format).
- Open it in a text editor (e.g., Notepad).
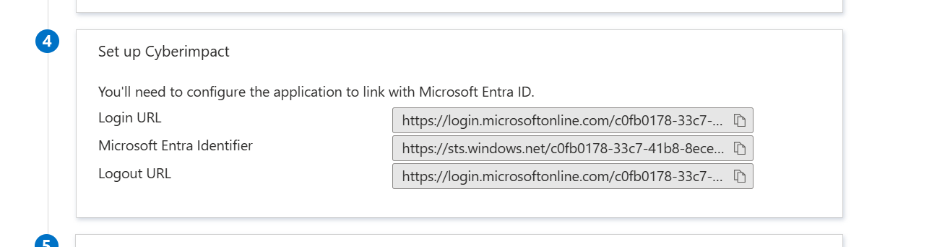
- In Microsoft Entra ID, copy the following information:
a) Microsoft Entra Identifier
b) Login URL
c) Logout URL - Upload the IdP details (IdP Entity ID, Login URL, optional Logout URL) and attach the Base64-encoded IdP x509 certificate file via a secure, access-restricted link with an expiration date (e.g., OneDrive/SharePoint/Drive) and share it with us.
- Notify our team once the information has been shared.
We will activate the SSO connection and confirm by email once setup is complete.
Assign users or groups
-
In the application, go to Users and groups.
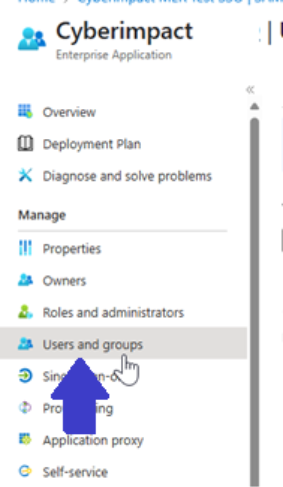
-
Click Add user/group.
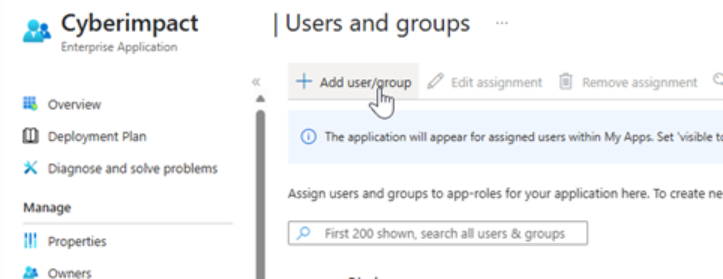
-
Under the Users section, click None selected.
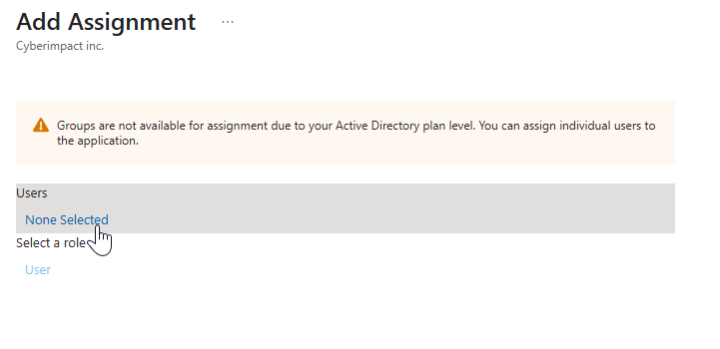
-
Search for and select the users or groups to grant access via SSO.
-
Click Select, then Assign.
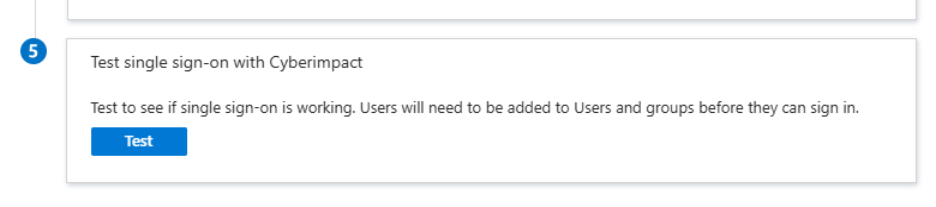
Test the connection
You can test the connection via:
- The Microsoft Entra portal
- The direct login URL
- Or the Test single sign-on section in the application configuration (in Microsoft Entra ID)
Need help?
Our support team can assist with configuration (SAML in Entra ID, attribute mapping, metadata sharing) and testing.
Contact our team
Sign in with SSO
Once your SSO setup is completed and tested, you can switch users to this access method for everyday use.
You can sign in in two ways:
From the Cyberimpact login page
- On the login page, click the Sign in with SSO button.
- Enter your email address, then click Sign in.
- If you are already logged in to your identity provider (IdP), you will be automatically redirected to Cyberimpact. Otherwise, you will need to authenticate with your IdP first (password, biometrics, etc.).
From your identity provider's (IdP) portal
-
Open your organization’s portal (e.g., Microsoft Entra ID app portal, Okta, OneLogin, etc.).
-
Click the “Cyberimpact” tile or use your IdP’s SSO login address (IdP Login URL) provided by your IT team.
-
Complete authentication on the IdP side (MFA, internal policies), and you’ll be redirected to Cyberimpact.
In both cases, you will then need to enter your Cyberimpact 2FA code (mandatory). If you register your device as a trusted device, you will not need to enter the code again for 30 days on that device.
Don’t see the Cyberimpact tile in your portal?
Contact your IT team to be assigned to the application.